
|
|
|
 06-19-2007, 04:52 AM
|
#1 |
|
Da Guy Wut Owns Dis Joint
 
Join Date: Mar 2007
Location: Texas
Posts: 3,566
|
How to Build a Stage
Method 1: Partial Standard Foundation The question keeps coming up: How do I build a club with a stage? There are two basic methods to get a stage into a Sims 2 building. One is to use the standard foundation; the other uses the split-level foundation. Let's do the first method first, since it would be methodical to do it that way.  1. Build your stage  Use the standard foundation tool to lay out your stage. Here I built a stage approximately the size of the stage at The Wreck. 2. Add some walls 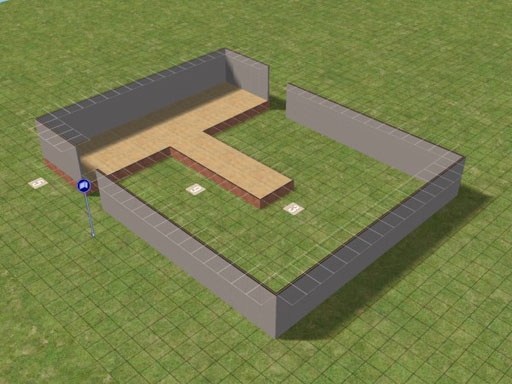 I built the walls around where the main room will be on the ground level. Don't try to close up the walls yet. 3. Use the dreaded cheat code: boolprop constrainfloorelevation false 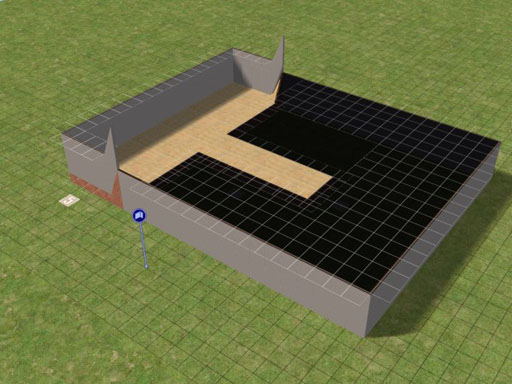 I used the command boolprop constrainfloorelevation false and closed up the walls! Eeek! Now my stage is terrible mess!  No worries; we'll fix that shortly. While we are here, I want to point out something very important that will help understand that constrainfloorelevation thing: Note that the edge of the foundation jumped up to match the top of the walls. That happened because the top of the foundation and the top a wall built on the ground are the same "level" in the game. Let's call the ground Level 0. The top of the foundation is Level 1, and the top of a wall built on the ground is also Level 1. Also note that the stage floor jumped up, instead of the wall slanting down, because I ran the wall tool up to the foundation. The height of the wall tool was in control. If I had used the foundation tool and extended the foundation to the wall, then the edge of the last section of wall would have slanted down to meet its level. 4. Add the Level 2 walls to the main floor. 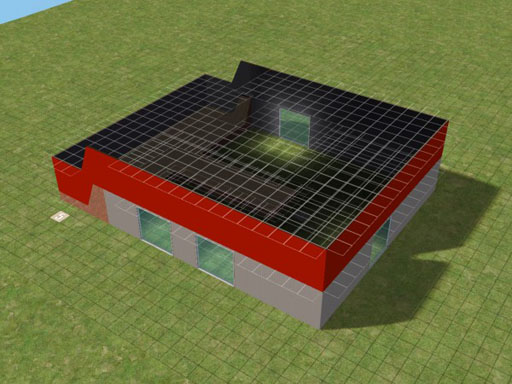 I added walls atop those tall walls and painted all of Level 2 red so you can see what's going on. Note that the new wall sections mate up with the walls I had previously built on the stage. (I also added some temporary windows to let in some light so you can see what's happening on the ground level, too.) Now I want to flatten something so that I'll have a flat roof. To do that, some of these walls have to squished to only 4 steps high, the height of the foundation. I have to choose: Do I want to squish the 1st level or the 2nd level. I'll want to add more of a club later, so I decided to squish the Level 2 walls. 5. Use flooring tool to flatten the stage floor. 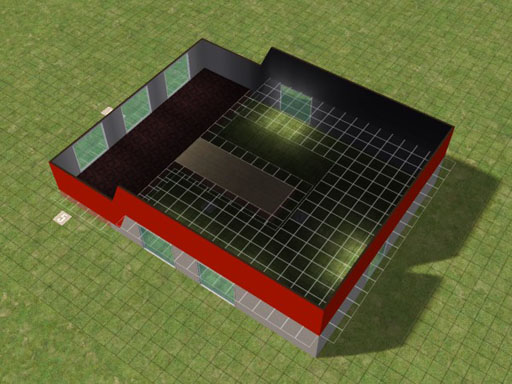 I selected a dark wood floor tile and dragged it across the stage, from the back corner to the front of the main stage. This flattened those nasty spots on the stage. 6. Use a floor to align the top of the walls  I want the top of all my Level 2 walls at the same height. To do that, I started with a floor tile in the back corner--which was at the height I wanted--and dragged it all the way across the whole room. 7. The walls squish into alignment 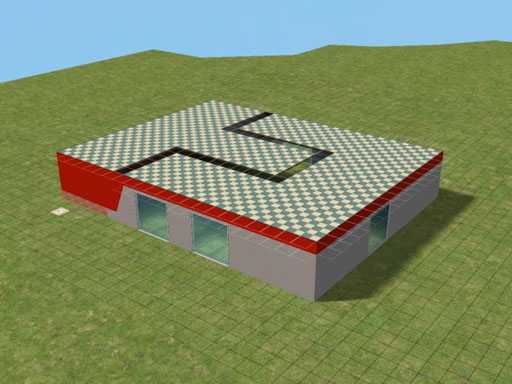 When I release the mouse, the top of all the Level 2 walls is nicely aligned. Note that in the main room, this means that the Level 2 walls have been squished down to only 4 steps tall while the walls on the stage are their full 16-steps height. 8. Turn off the cheat code and make it pretty. Now you're done with the tricky part. Use "boolprop constrainfloorelevation true" to turn off the cheat code.  I added another level to the whole thing. I wanted the building to be taller so I added another level of walls. I deleted the tile floor that I used to align the wall tops, leaving the whole volume open. Then I just roofed it over with a nice asphalt roof, finished the walls in white brick, and added the pediment to make the roof look nice. 9. Finishing the establishment  The staff entrance and dressing rooms are at the back. To finish off the part of the club, I built on a 1-story section for dressing rooms and stuff onto the back. Some curtains (2-story painted walls) and lights complete the stage environment. At that point, something was missing, but here she comes now! 10. Tabitha Swan takes the stage!  Tabitha wanted to rehearse before the club opens. All we need is some chairs, an entrance, a ticket booth, and of course, one other thing...  "Call in Kevin and the frat boys!" Last edited by Greg : 07-03-2007 at 03:32 PM. Reason: typos... typos... typos... |

|

|
|
06-20-2007, 02:18 AM
|
#2 |
|
Da Guy Wut Owns Dis Joint
Join Date: Mar 2007
Location: Texas
Posts: 3,566
|
How to Build a Stage
Method 1a: No Foundation This is a variation on the partial foundation where we use a single foundation block as a level reference but in the end have no foundation at all. This same technique works for building foundations for regular houses. Step 1: A single foundation block  Looks kinda lonely, dudn't it? Step 2: Lay out some walls  Add some walls to keep the foundation block company. The closest wall needs to be within 3 squares of the foundation block because we're going to bridge the gap with floor tiles. In the image above, I left out some wall sections to let in light. Let's finish off our wall layout and toss in some lights so we can see what's going on.  Added runway and closed it up. Lights let us see what's going on. If you want to add lights while you're building, you'll need a sim to turn them on; so this only works on an occupied residential lot. Fortunately, Tabitha is still here and doesn't mind that she has to keep running over to flip the circuit breakers. Step 3: Flatten the walls  Use flooring to flatten the walls to the level of the foundation block. You need boolprop constrainfloorelevation false for this. Start with your floor tile on the block and sweep it to the walls. Then work your way around, flattening all the walls. You don't have to finish off the floor; we're going to delete it anyway. Just make sure you've flattened all the walls. Step 4: Delete the floor  We're done with that floor, so delete it. Once all the walls are level with the foundation block, we can delete them. Now turn off the code: boolprop constrainfloorelevation false Step 5: Delete the foundation block 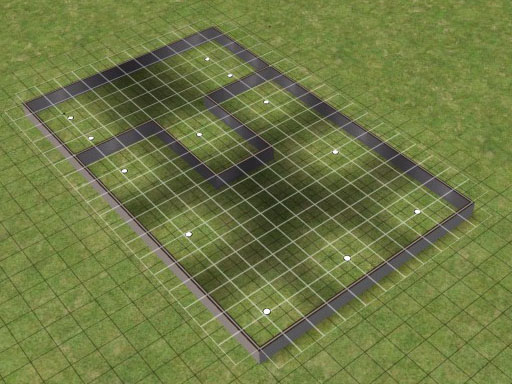 Delete the foundation block We don't need that lonely little foundation block any more so we'll send it back to play with its friends. If you neglected to turn constrainfloorelevation code off, nearby walls might pop back up to their original height. If that happens, just undo and try again. Step 6: Floor the stage  Add a floor to the stage Now's a good time to put some flooring on the top of the stage. I had to delete the lights under the stage before the game would let me floor right above them. Step 7: Add walls  This joint needs some walls. We're not building an outdoor theater here, so add a level of walls. Step 8: Doors  Uh oh! Our doors are messed up! Look what happens when we try to add doors at ground level so that people can get into this place. The upper wall blocks most of the door! We can fix that making the walls near the doors stretch back to their full height. Set boolprop constrainfloorelevation true to do this. 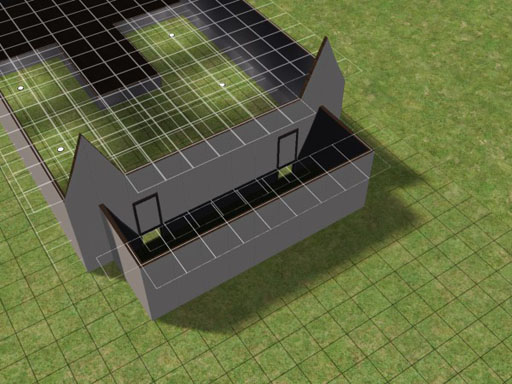 Some more walls give us a reference level. Running some new ground-level walls right up to a spot near the doors makes them stretch back up to match. (Another way to do this is to put in a garage door and then remove it once you've got the wall height fixed.)  Again, flooring levels the tops of the walls. Here again, I used flooring to make the tops of the walls line up in this section of the building. Our doors are finally clear! Step 9: Level off the upper walls  Floor tiles leveled the top of the walls Once I had the doors clear, I went up a level and used floor tiles to bring the upper walls down so that I'm ready to build a nice flat roof. Now you can set boolprop constrainfloorelevation false. (If I'd wanted to leave the roof raised like a billboard, I could have used floor tiles to roof over the building before I added those extra walls in step 8.) At this point, I could have deleted the walls that I used to stretch the walls near the door, but I liked them so I kept them. They form a nice front entrance to this little showroom. Step 10: Finish off the building.  The Brick Striphouse Here's the finished building. It still needs quite a bit of outfitting to make it a viable show place, but the complicated bits are all done. Back in Step 9, I added a stage door and steps up to it so that the sims could get to it. And speaking of which, here she is! 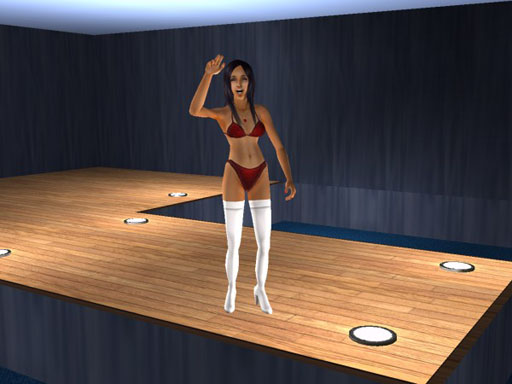 The Blue Room at The Brick Striphouse received Tabitha's stamp of approval. But she was still campaigning for the addition of bathrooms. Last edited by Greg : 06-20-2007 at 04:39 AM. |
|
|
|
|
06-20-2007, 03:39 AM
|
#3 |
|
Da Guy Wut Owns Dis Joint
Join Date: Mar 2007
Location: Texas
Posts: 3,566
|
How to Build a Stage
Method 1b: Club on Foundation with Sunken Audience Pit Methods 1 and 1a both used the foundation for the stage but had the entrance to the club at ground level. This time we'll do the easiest one of all: Build the club on a foundation and dig down to ground level only for the showroom floor. Step 1: Build a foundation 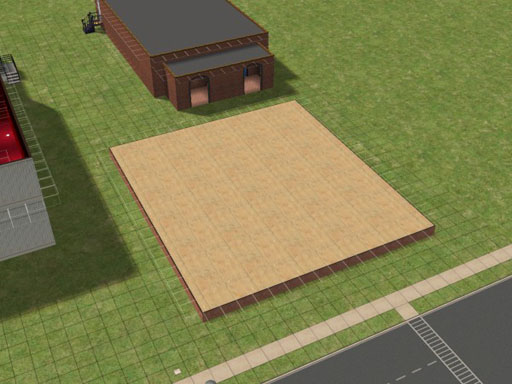 Build a foundation for the whole establishment. Simple enough. You just need a foundation large enough to hold whatever you want this establishment to have. Step 2: Figure out where the audience will go  I used flooring to sketch out what goes where. This is a technique I use a lot when building. I just sketched in where things would be once I was done. I'm just building a show room here, so I don't need a lot of detailed planning. The wooden area is where the stage will be and the green is the entrance to the club. Step 3: Cut out the audience pit.  Just use the foundation tool to cut out the audience pit. It's the same as if you were digging a basement; just don't dig. That's it! No need for scary cheat codes. Step 4: Finish decorating and outfitting the club.  Will Tabitha like this one? Here's our finished showroom, all ready for Tabitha's inspection!  Tabitha was eager to check out the new place. She came a-runnin' as soon as I told her it was ready! And moments later, she came a-runnin' right back out again! "The roof is too low for that big room!" she said. "It's claustrophobic in there! And it's boring! It needs some neon!" "Erm... all right," says we. "Got a favorite color?" "Green!" "Green? Green light will make your skin look ghastly!" "No, just for the neon and the backdrop. People keep building clubs in fleshtone colors--red and pink and purple and tan. Green is better because the dancers will really stand out against the background! We'll call the place Green Lightning!" "OK, if you say so!" And so we did.  Green Lightning got a higher ceiling over the show room. I inset the higher ceiling to give it more visual depth. It makes it a lot less claustrophic and actually makes the room feel even bigger.  This is what I wanted! "Yay! This is what I wanted!" Tabitha said. "It is green!" "I get it. And the lightning bit comes from the neon on the interior walls?" "Naw, that's just an accent. Lightning is electricity and heat, baby. I'll make the lightning!"  "I'll make the lightning!" Last edited by Greg : 06-20-2007 at 04:41 AM. |
|
|
|
|
11-28-2008, 08:42 PM
|
#4 |
|
The Super Kitty :)

Join Date: Nov 2008
Location: Somewhere over da rainbow :)
Posts: 58
|
I prefer spit level foundation for stages.
I usually go with this shape:: l ___________________________l ___________________________ l l
__________________
 ~Megan~ ~Megan~
|
|
|
|
|
11-28-2008, 08:42 PM
|
#5 |
|
The Super Kitty :)
Join Date: Nov 2008
Location: Somewhere over da rainbow :)
Posts: 58
|
it messed up
__________________
~Megan~
|
|
|
|
|
11-28-2008, 09:04 PM
|
#6 |
|
Goddess for Life

Join Date: Mar 2007
Location: NY State
Posts: 3,303
|
There might be a CODE tag ... lemme try...
Code:
|
|_________________
 _________________|
|
|
__________________
A game that horrible Odessa-person introduced me to: http://www.puzzlepirates.com/?affili...163251&lang=en I'm spreading the addiction by corrupting all my friends (and attempting to make in-game money when they try the game). |
|
|
|
|
11-29-2008, 01:38 AM
|
#7 |
|
Da Guy Wut Owns Dis Joint
Join Date: Mar 2007
Location: Texas
Posts: 3,566
|
So we're talking about a long runway with no main stage at the end of it?
__________________
Who are all these people and what do they know? 
|
|
|
|
 |
| Thread Tools | |
|
|


