
|
|
|
 09-10-2008, 02:38 AM
|
#61 |
|
Reticulated MoonBat
 
Join Date: Apr 2007
Location: My trusty computer in Issaquah WA, USA.
Posts: 848
|
Well, you asked for it & now it's here:
*** ZW's PICTURE LADEN SEMI-HELPFUL TUTORIAL THINGY *** First up, this is not the best written tutorial ever about Sims 2 skinning. It's more of a "play-by-play" or "what you should know" type thing. It also has pictures. Several pictures. So many pictures that I will most likely be breaking this post up into 2 parts. So if you happen to be reading this & it just sorta ends, rest assured that I am frantically typing away on the second half (or maybe taking a dinner break) & will post it as soon as I'm done. Okay, so what exactly is this thing about? Well, it's about how to make what's known as a Dependent Default. Dependent Defaults are Overrides that- instead of having new textures of their own- basically "tell" the game were to go to find the texture(s) you want to be your Defaults. I learned about Dependent Defaults on a tutorial by HP on MTS2 (I will link to it in the "closing credits") but as her tutorial is A) text only & B) not exactly well supported as far as questions go, I'm barging forth & posting a picture filled version of my own here. So, what's all this stuff about "telling" the game where to go? (Now, now; you know what I mean!) Well, I'm going to try & show you! First up, to make your own Default Replacement, you need: -SimPE (NVidia Tools installed too, if you what to understand the second part of this tutorial) -Default Replacement(s) Templates -Custom skins that you would like to have be defaults -Body Shop & some time. In my case, I used a set of empty Default Templates I got from MTS2 (attached to this post) & 4 of Recoradyn's wonderful Maxis-colored skintones with hair enabled for infants. Obviously, you are free to use whatever you want! First let me explain this "telling the game" stuff. To do that, let's take a peek inside 2 different skin files; a Default S1 (Light) template & Recoradyn's S1-with-blonde-infant-hair. So... 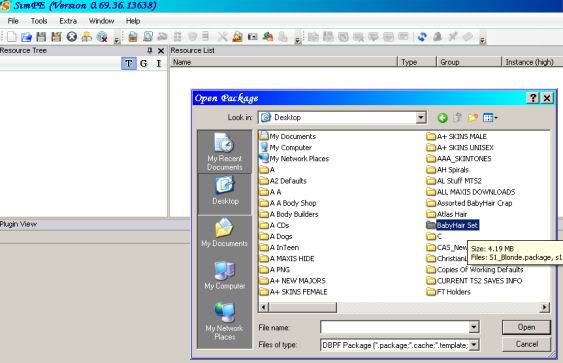 ...I will fire up SimPE, select "Open" & navigate to a folder that just happens to have both those files inside. How convenient! Let's take a look inside the Default S1 template first. Opening it up we see 2 different "categories" listed under the resource tree to the left; Material Definitions & Texture Images. So... 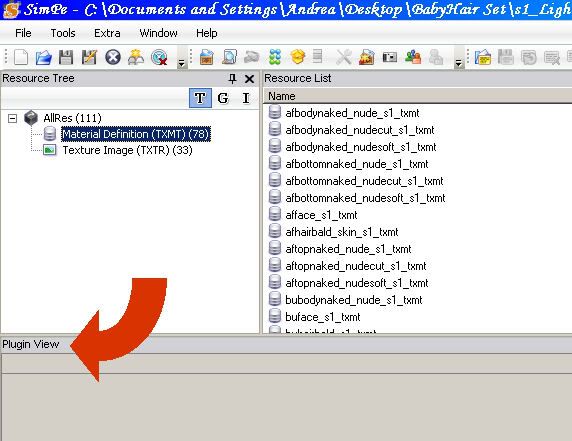 ...lets select Material Definitions. Make sure you have the Plug In view up! (That's what the red arrow is trying to show you!) Okay, now let's take a look at the Default's idea of what passes for baby hair. Select the buhairbald_s1_txmt file like so... 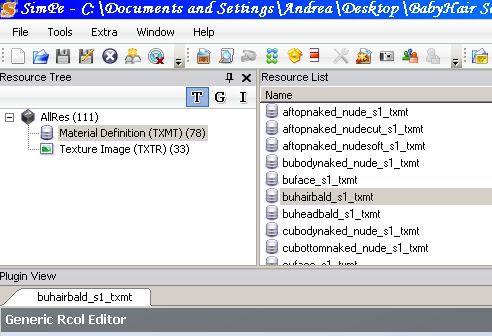 ...and take a look at the lower left of the Plug In window. More specifically, take a look at the stdMatBaseTextureName: entry. 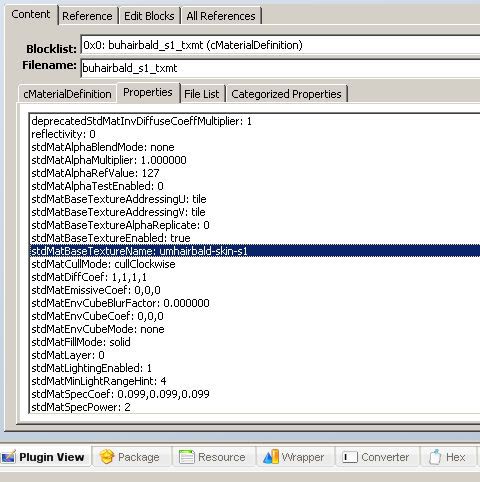 Notice it says "umhairbald-skin-s1. Take a look to the lower right... 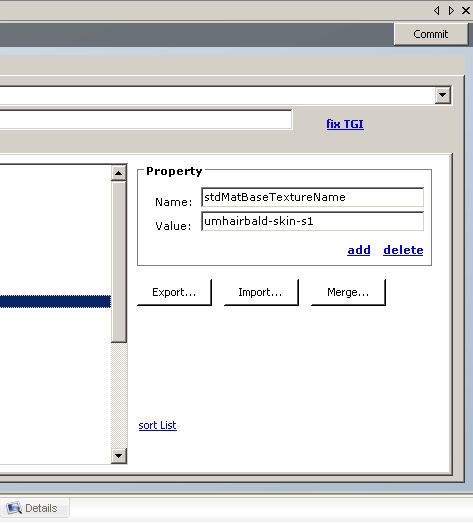 ...and see that the same thing is listed in the Value box. Okay, now lets take a look at the S1/Blonde Baby Hair custom skin file.  Notice that there is a lot more "stuff" crammed into the Resource Tree window! That's because the Default Templates are just using the pre-existing Maxis files, where as a custom skin is using it's own textures & needs to include them in it's file. Selecting Material Definitions & finding the custom skin's Bay Hair file we see...  ...that stdMatBaseTextureName file is quite different that the Default template's! Looking over to the right...  ...we see that same alphabet soup file name entered under Values. So what, exactly does this mean? Well let's find out! Still in the S1/Blonde file, lets select Texture Image. 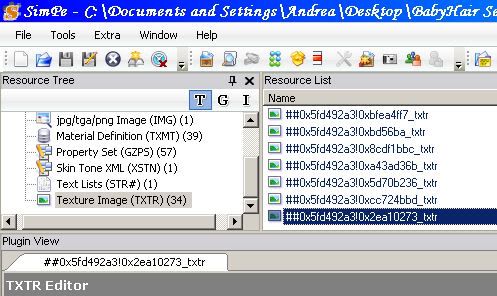 As we scroll through the files we just happen to spy a file with the same alphabet soup name as we saw entered under the Value entry. Clicking on it reveals... 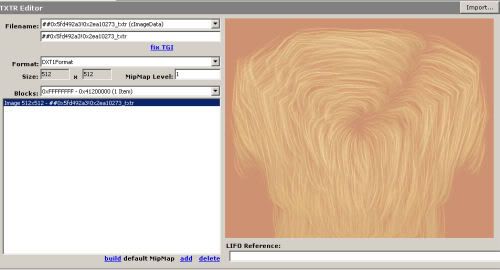 ...a nice little head of blonde hair, just right for babies! How cute! For comparison, here is what the Default Template shows us under it's Texture Image for umhairbald-skin-s1. 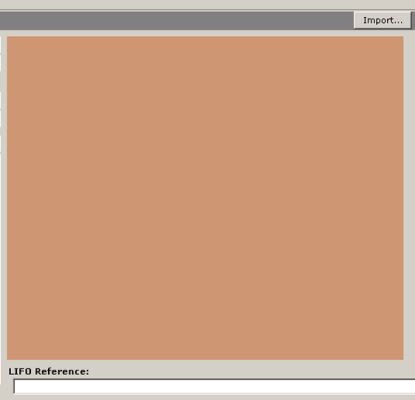 Ick. Well okay, it can be pretty sexy on the right guy (  ) but we all know that many babies are born with cute wispy little heads of hair. ) but we all know that many babies are born with cute wispy little heads of hair.We also know that the custom skin has cute hair enabled for babies. Here's the cool part: By pasting the Texture name for baby hair (the alphabet soup entry) into the buhairbald_s1 file of the Default template (delete the umhairbald-skin-s1 entry & replace it) we can now tell the game "hey, next time you're generating a S1 baby, this is the file you need to use for it's hair." Since we have entered the value for the S1/Blonde baby hair there, then that's the file the Default template will obligingly use! Yippe! See where this is going? By pasting the name of the custom texture you want into the right place of the Default Template, you can tell the game to use whatever files you want as Defaults! Pretty slick, huh? Of course, you also need to make sure that you have the Custom file in your game too (so the game can find the right textures) but you knew that already, right? Eek! It's 7:30 & I have to make a run to my Aunt's house to feed her 3 cats (she's on vacation) so I have to dash. I will continue this thing when I get back! For your amusement, I am attaching a set of (blank) Default Templates to this post. Keep in mind they are BLANK (no textures) so you will need to do some DXT building, which I will describe in the second part of this post for those who are unsure how. -ZW
__________________
** Long Live All Wild Canines! ** ** Leader Of The Moon-Bat Revolution! ** |

|

|
|
09-10-2008, 03:56 AM
|
#62 |
|
Goddess for Life

Join Date: Mar 2007
Location: NY State
Posts: 3,303
|
Wow! I'm impressed...
Do we want to split the thread or start a thread with a link to the post above and immediately close it? People, including me, are never going to find this in mid-thread in just a couple weeks... I'm thinking this is the info I need to fix up some skintones for my purposes too!
__________________
A game that horrible Odessa-person introduced me to: http://www.puzzlepirates.com/?affili...163251&lang=en I'm spreading the addiction by corrupting all my friends (and attempting to make in-game money when they try the game). |
|
|
|
|
09-10-2008, 12:09 PM
|
#63 |
|
Da Guy Wut Owns Dis Joint
Join Date: Mar 2007
Location: Texas
Posts: 3,566
|
This is great! I learn a heck of a lot just by seeing how you used SimPE to navigate around. Is there more to come here?
I could split this off as a separate thread when you're done.
__________________
Who are all these people and what do they know? 
|
|
|
|
|
09-10-2008, 05:21 PM
|
#64 |
|
Reticulated MoonBat
Join Date: Apr 2007
Location: My trusty computer in Issaquah WA, USA.
Posts: 848
|
Sorry about the unexpectedly long beak! Didn't get back from my cat feeding duties until after 11 PM (multiple car "rear ending chain" on the bridge I needed to cross) so I pretty much just crawled into bed.
I was very tickled to see the "special post" in the Help section linking to this quasi tutorial of mine! I only hope it helps/makes some sense! Now where the heck was I....oh, yeah... I should explain a couple things about "part 1" of this tutorial...like why, for instance, did I say Body Shop & the NVidia Tools were needed when I haven't said anything about using them yet? Because you will need Body Shop & the NVidia Tools to create the DXT files you need to put into those empty Default Templates I posted. Also, if the file you want to replace is a face texture- not just a hair or skin file- you will need to replace the appropriate Texture Image (DXT) in your Default Override package, as just linking the Default face file to the Custom face file will result in an error when Sims age. Note that if you are just tweaking an existing Default Override, this step may or may not be necessary, depending on what all you're doing. Let me explain: DXT files are what you need to replace the actual Texture Image files in a given package. The "cut-n-paste" thing was about the Material Definitions files. Material Definitions tell the game what files to use for a given Sim part, where as the Texture Images are those files! Confused? Okay, how about this: Let's say you already have a set of user-made Custom Default Overrides installed. Since they already have a complete set of (custom) Texture Images, there is no need to do any DXT building if all you want to do is point the game to different Material Definition file (or two) to use. (Unless what you want to replace is a Face!) So say one of your Overrides is called PurplePeople, & it overrides the S1 (lightest) skintone so all S1 Sims are varying shades of purple. You have a thing for people who are purple, so this is is good & makes you happy. Then one day you happen across a skin file called CustomPurplePeopleGlitteryScalps, which is a Custom Skin that not only makes Sims purple, but also gives them a nifty rainbow glittery looking scalp. While purple Sims are cool, purple Sims with glittery scalps are even cooler...but *sigh* it's a Custom Skin, so while you can create new Sims with glittery scalps it won't effect your existing Sims. You really want all your currently purple "S1" Sims to have the cool glittery scalps, but don't want to hand edit them all in SimPE. Then you notice that, heck; that new glittery skin set is nearly (if not exactly) identical in color to your current Default. In fact, the only thing about it that is really all that different is the cool glittery scalps, which would blend so nicely with your existing Override...hold on a minute? Didn't you just read somewhere that you can cut-n-paste Material Definition files? So first you... 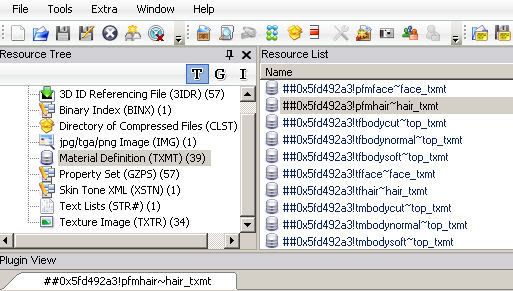 ...fire up SimPE & open up the Glittery Scalp custom skin. You are only interested in the cool glitter scalps (what the game calls "hair" for skins) so you go to Material Definitions & select the Toddler hair file. In the Lower Left Plugin field you see... 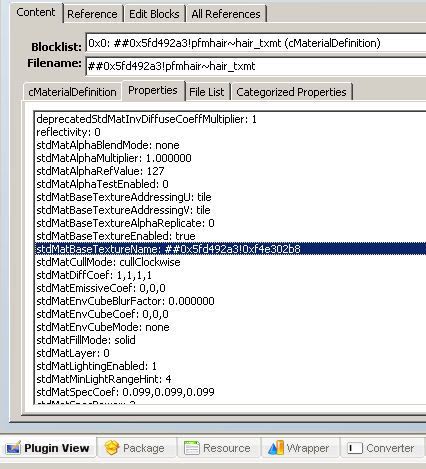 ...a strange alphabet soup name listed next to the stdMatBaseTextureName. Taking a look to the Lower Right...  ...you see that same soupy file listed next to Value. You copy the soupy file name & paste it into a Notepad (or equivalent) file next to a description like "Glittery Toddler Scalp" because you are smart & realize that you need to get the soupy names for all the Glittery Scalps & don't want to be bouncing back & forth between the Glittery file & your current Default. If the Glittery skin uses the same file for all it's scalps, you won't need the Notepad step as you can just highlight, copy (CTRL+C) & leave it it on your clipboard...but make sure those scalp files really ARE the same, as many times (especially with custom skins) they are not! Okay, you have all your scalp files safely stored in your Notepad file, next to a brief notation as to which file is for which age. Now it's time to open up your current non-glittery purple Default skin package... 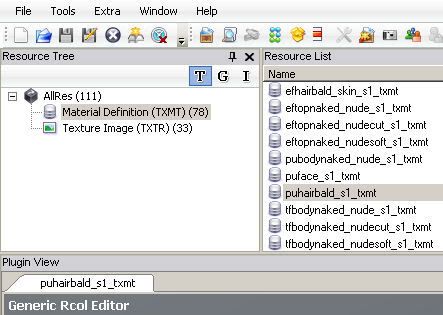 ...and once again navigate to Material Definitions. We will start with the Default's Toddler Hair file for no reason other than this whole Purple Default v.s. Purple Glitter thing is total fantasy & the only pictures I faked-up were for the Toddler Hair files.  Looking at the Lower Left of our Default, we see... 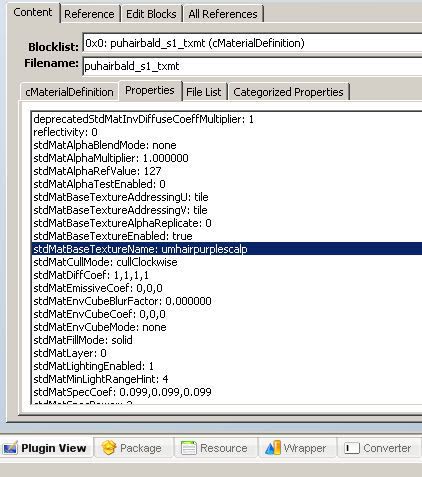 ...that the stdMatBaseTextureName looks quite different. Rather than alphabet soup, it has a name. Actually, it could be a series of soupy stuff too, but as these pictures are faked, I wanted to help ease any confusion! While it may be a cool name (I spare no expense when it comes to doctoring up tutorial pictures) it's not glittery, so... 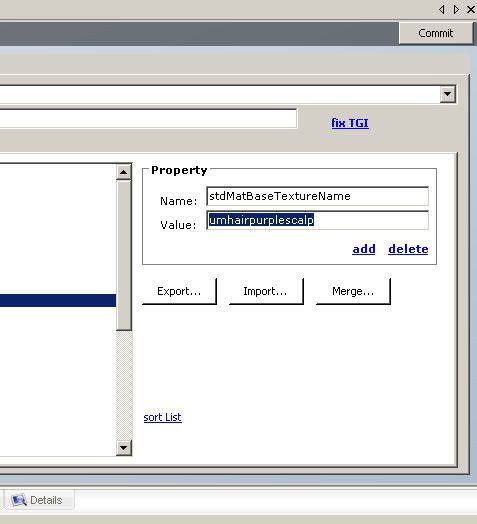 ...you pop over to the Lower Right, highlight the cool non-glittery file name... 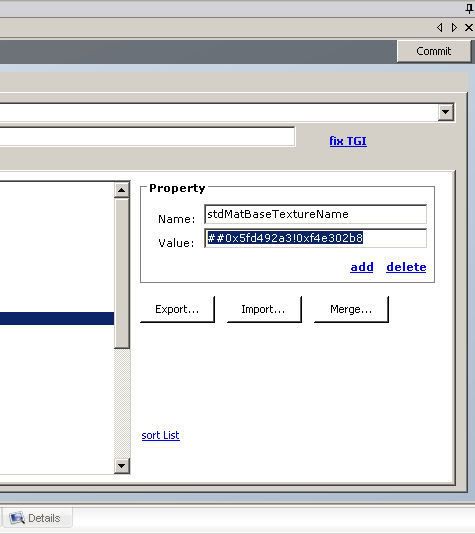 ...& replace it with the one you ever-so-smartly copied/pasted into that Notepad file. Remember to hit the Commit button! Now do this for all the scalp files, save the package & *poof*, your Default will now draw on the files in the Glittery Scalp custom skin when it makes Sim's scalps. Cool...but what about replacing Faces or using that set of empty Default Templates I posted earlier? Well, now it's time to learn about DXT building! This involves more pictures, so I will break off here & get them ready. To recap what we know so far: You can copy/paste the stdMatBaseTextureName files to your hearts content, but you need to make sure that you also have the Custom skin(s) whose textures you are "linking to" in your game as well. If you are just making changes to an existing ("fully functional") Default and are not linking to a different face texture, you don't need to worry about the Texture Images & DXT stuff. If you are changing a face file, or wanting to use the empty Templates I posted earlier, then you will need to get comfy & learn about DXT files! Hang on while I type my DXT tutorial up frantically! -ZW (Greg, as soon as I post Part 3: DXT Files For Dummies, I will be done...)
__________________
** Long Live All Wild Canines! ** ** Leader Of The Moon-Bat Revolution! ** Last edited by Zirconia Wolf : 09-10-2008 at 05:28 PM. Reason: cosmetic |
|
|
|
|
09-10-2008, 09:10 PM
|
#65 |
|
Reticulated MoonBat
Join Date: Apr 2007
Location: My trusty computer in Issaquah WA, USA.
Posts: 848
|
*** DXT FILES FOR DUMMIES ***
Yes, there are other tutorials on DXT file building out there, but heck; what's wrong with one more? Anyway, it's got pictures & stuff. To make life easier, let's say you have SimPE & the NVidia Tools already installed. You also have the empty Default Templates I posted earlier & a Custom Skin that you are interested in making into a default. Make sure that this skin is in your Downloads folder before continuing! Ready? Step 1: Fire Up Body Shop. This may take a while depending on your Download folder's size. Once Body Shop is up & running... 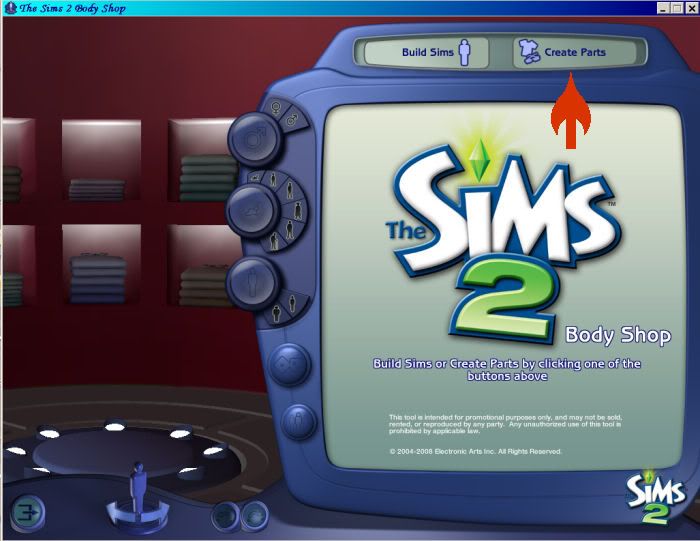 ...select Create Parts, not Build Sims. Next, you will want to... 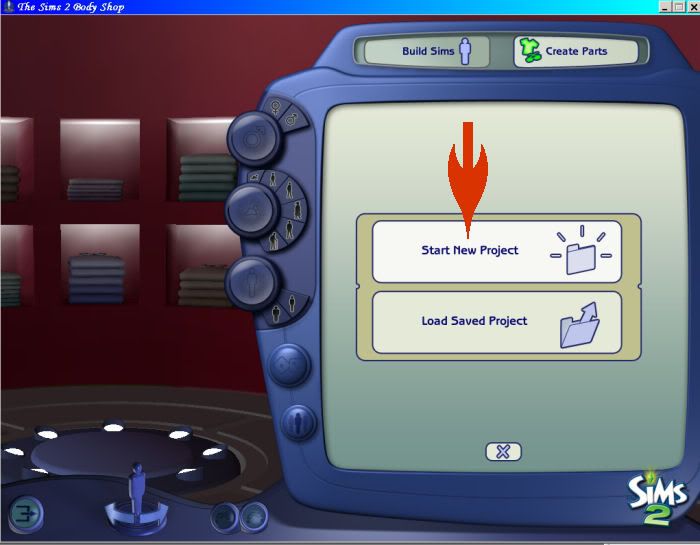 ...select Start New Project. Okay? Good. Now we want to... 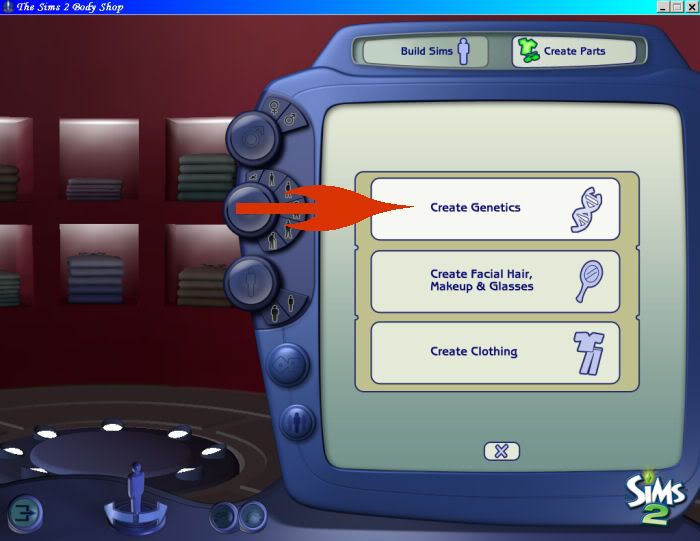 ...Create Genetics. The very next thing we do is... 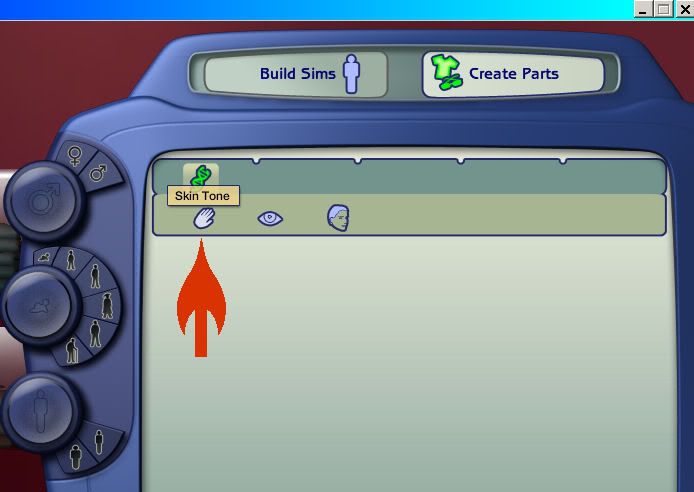 ... select Skintones, because after all, that's what we're after! Moments later, you will see a screen that will most likely not look exactly like the next picture, as these pictures are- of course- taken on my over stressed PC & not yours! Anyway, exactly what you see will vary, but what you want to do is... 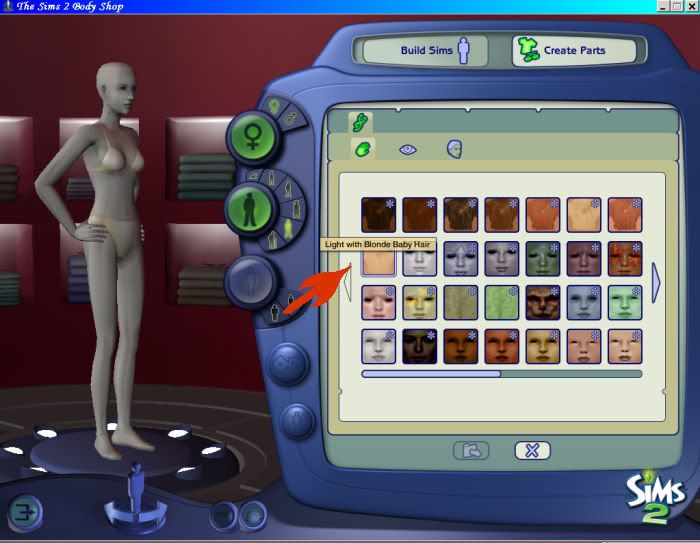 ...select the skintone you want to make into a Default. I am choosing (a slightly modified version of) Recoradyn's S1 skintone with Blonde baby hair enabled. You, of course, will choose whatever you want! Next... 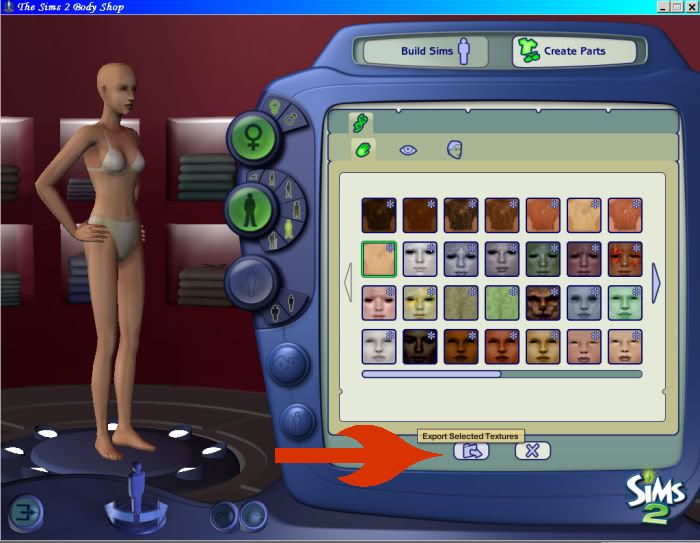 ...it's time to Export Selected Textures. When exporting, give the file a name you will remember & close out Body Shop. It has served it's purpose, which was simply to extract the Textures of our soon-to-be Default Skin so that we may slap them into an empty template. Go to your "saved game" folder (not the Program Files one), which is most likely: My Documents\EA Games\The Sims 2 & look inside the Projects folder. Lo & behold, you will see some files, one of which is a folder with the same name as the skin you just extracted. I wonder what's inside of it? Well, in my case... 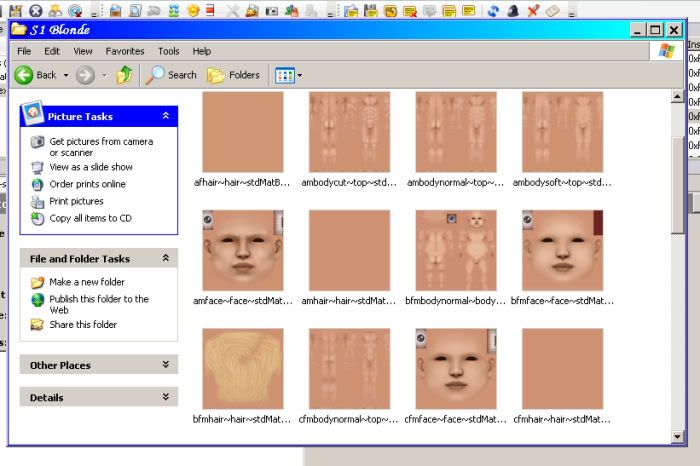 ...it looks like this. (Oops! Sorry! Didn't crop that one as well as I had thought!) Yours will be pretty much the same, at least as far as the kind of files you will see. Now what? Well, I would highly recommend that you change those BMP files to PNG. While not necessary to continue, it will help with file size & image quality. Also, dragging those files somewhere easier to get to (like your Desk Top) is a good idea too. Whether you do that or not, it's now time to put some textures into those empty Defaults! Ready? Okay. Our next step is to launch SimPE (which can take a while in & of itself...though not as long as Body Shop) & then open up whatever empty Template you are going to be working with. For the sake of this tutorial, I am using the empty Default Template for the S1 (lightest) skintone. Obviously, you are using whatever Template you want! So, I want to... 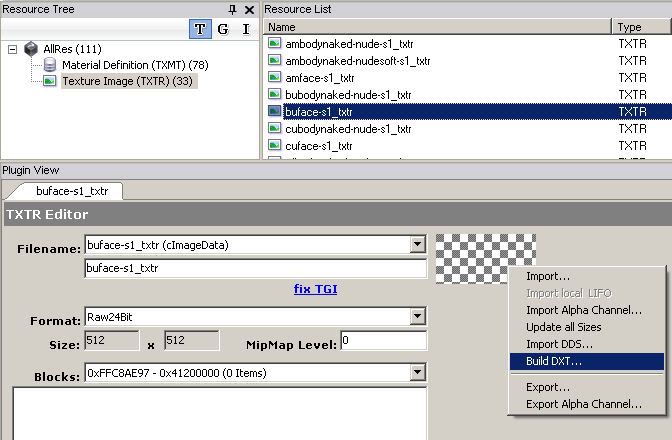 ...select Texture Image. Select the texture you want to replace first. Normally, this would work out to be the Adult Female Cut Body template as they tend to be in alphabetical order (& I highly recommend that you work from "top to bottom" to keep things easy), but I am using the Baby Face template here as baby faces are cuter. In the lower right, you will see a small "checker board". Remember the problem I had with Guy Tester looking totally blacked out for a while? Well, the reason that happened was I had forgot that these templates are BLANK, which is what that checkerboard is telling you! To get rid of that checkerboard (& "Blackened Sim" problems) you need to replace that checkerboard with an actual visible texture file. To do so, right click on the checkerboard & select "Build DXT" from the drop down menu. Next, a little window will pop up. 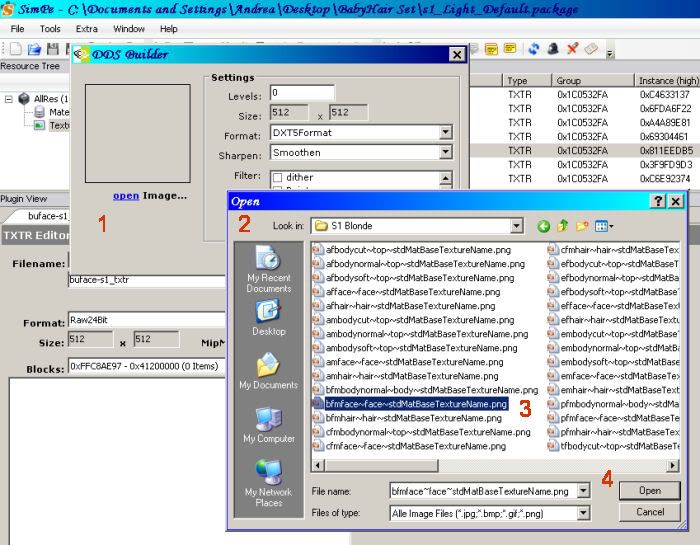 Now you want to: 1 : Select the Open option at the bottom of that little box. 2 : Navigate to the folder that contains the skin textures you just extracted via Body Shop. 3 : Select the texture that you want to import. The names are fairly easy to figure out, though sometimes not exactly the same, so you may have to think a bit! 4 : Once you have determined the correct file, select Open. After all that, you will see something like this: 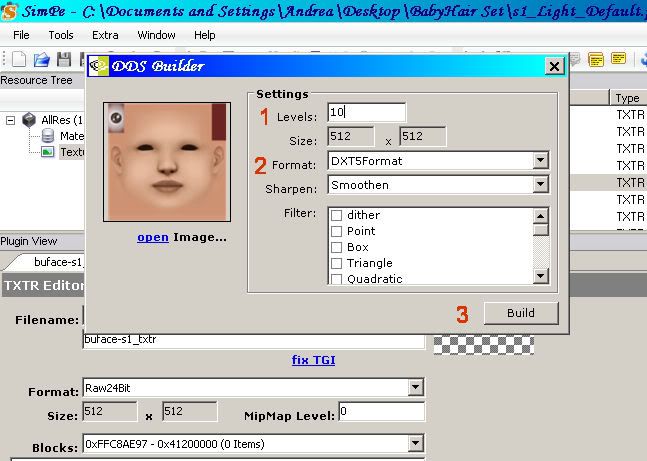 What next? Well, 1 : In the Levels field, enter 10 if the file is 512x512 (like a face) & 11 for a 1024x1024 (most skins) 2: Choose your DXT level. You can choose 1, 3, or 5. DXT 1 is the most "compressed", which will give you smaller files, but degrades texture quality. DXT 5 is the lest compressed (so larger file sizes) but has better image quality, so that's the one I use. Also, if editing a Vampire or other transparent skin, note that DXT 1 can not support transparencies. 3: Now select Build. Don't panic if you see some funky half blacked out screens pop up for a moment or two. (I wasn't fast enough to get a picture of them.) This is normal & is just what happens when the NVidia tools are doing their thing. It won't be long until... 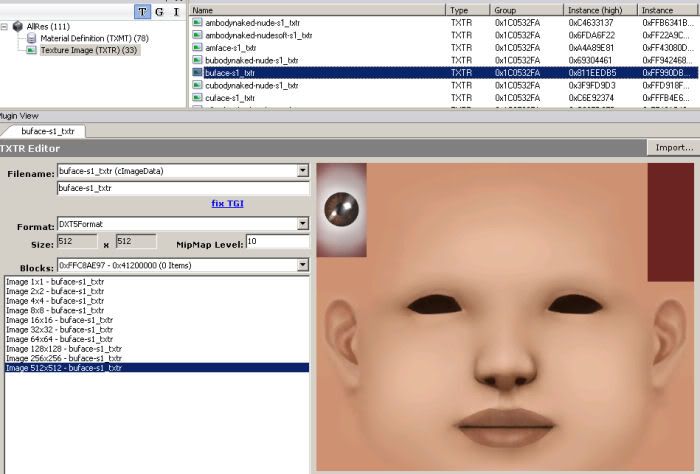 ...*poof*, that drab checkerboard is gone & a cute little baby face (or what have you) is in it's place! So that's it, right? Not quite. Now you need to... 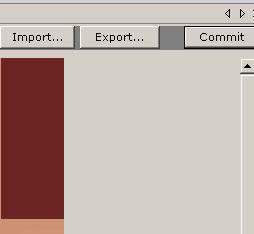 ...scoot on over to the right. See that Commit button? Press it! Hey, what just happened? Well, if you look up top at your Texture Image entry... 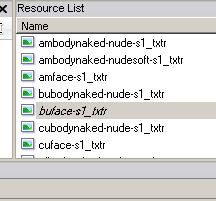 ...you will see it is now in italics. If that doesn't clue you in that something just happened, then maybe... 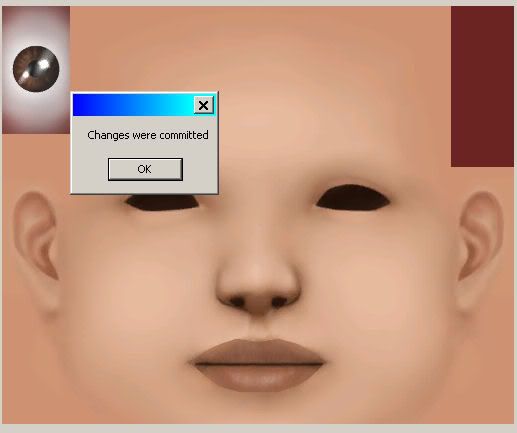 ...this will! Click on the ok button. Now repeat all that for the rest of the Textures. When you are done... 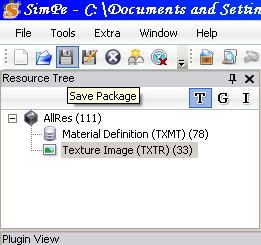 ...remember to SAVE YOUR PACKAGE!!! Oh please remember this. You will cry if you don't! Guess what? You just created a working Default Replacement. Pat your self on the back (you deserve it) & have fun! That's it! ******** TROUBLESHOOTING ******** Hey! I don't get an option to Build DXT! What Gives? After installing the NVidia Tools, you need to tell SimPE were to look for them. Instructions on how to do that (as well as pretty much everything else I have tried to explain) can be found here: http://www.modthesims2.com/showthread.php?t=194390 Hey! My Sims are all (or partially) blacked out! What Gives? Oh, you mean kinda like this?  That means you still have empty Textures in your Default file. Just make sure you replace all the textures & you will be fine. Hey! I don't want all the hassle of replacing all 33 of those empty Textures! Well then why did you start with an EMPTY Template? Hey! I started with an Empty Template because that's what you said to do! Not really. I was just showing you how to build your own Defaults from scratch. If you don't want all that hassle, just find Default you like & use those. Hey! I already have Defaults I like, but I want to change a file or two. Can I do that? I don't know; can you? Hey! That was a smart-alec answer! Yes it was, but I'm tired of you yelling "Hey" at me all the time! Anyway, were you not paying attention to the first post in this tutorial? It was all about how you can link a Default to a Custom file & basically mix-in-match as you see fit. Hey! What if I want to recolor a file before putting it into my Default? Then you will need to run it through Pant Shop Pro or whatever program suits your fancy. (I'm a fan of Paint Shop Pro X) Hey! I don't know how to use those programs! Will you teach me? No. That's something you will need to figure out on your own as I have no way of knowing how to work every freaking picture-editing program out there! There are all sorts of tutorials on those programs, so you should have no problem finding the help you need...however if you are using Paint Shop Pro- and don't yell "Hey"- I could be persuaded to give you a tip or two, should you ask me. Nicely! Hey! I just read your flipping tutorial & it didn't make any sense! Okay then, here's the link to Hysterical Paroxysm's tutorial on the same subject: http://www.modthesims2.com/showthread.php?t=222953 Be warned however that it is not "beginner friendly" & has no pictures. Hey! Actually, I just want to have Infant Hair Defaults & was sort of hoping to use yours! Unfortunately, those files range from 8.5 MB (zipped) & up, so I don't think I can upload them here. I can email them to you on request (if you think your email can handle it) & am considering seeing if MTS2 would host them. (If I find a way to get the file size down better, I will attach them to a post here, though!) -ZW (P.S. Greg, this should do it!)
__________________
** Long Live All Wild Canines! ** ** Leader Of The Moon-Bat Revolution! ** |
|
|
|
|
09-10-2008, 11:11 PM
|
#66 |
|
Goddess for Life
Join Date: Mar 2007
Location: NY State
Posts: 3,303
|
And this answers Greg's ancient question on how to make default replacements!
__________________
A game that horrible Odessa-person introduced me to: http://www.puzzlepirates.com/?affili...163251&lang=en I'm spreading the addiction by corrupting all my friends (and attempting to make in-game money when they try the game). |
|
|
|
|
09-11-2008, 12:45 AM
|
#67 |
|
Da Guy Wut Owns Dis Joint
Join Date: Mar 2007
Location: Texas
Posts: 3,566
|
Not quite: My question about default replacements is how to replace the mesh that the default sims use.
Nevertheless, this is really cool, ZW! 
__________________
Who are all these people and what do they know?
|
|
|
|
|
09-11-2008, 01:16 AM
|
#68 |
|
Reticulated MoonBat
Join Date: Apr 2007
Location: My trusty computer in Issaquah WA, USA.
Posts: 848
|
According to BlooM, to replace the default Elder Mesh with the Maxis Adult one:
-Open up SimPE & use the Searcher (File Finder. Looks like a pair of binoculars) -Use "Name Search" & search for: eftopnaked efbottomnaked emtopnaked embottomnaked For each file, look for the gmdc file. Double click it so SimPE can load it, which will take sometime. Once it's loaded, right click it & extract it somewhere you can find it. when extracting, give them the same name, not the long number. After extraction all 4 (or 8, if you do both Hi & Lo poly meshes) files, start a new package & import the files you just extracted into it. Save it & then: Go back to the File Finder & search agai, this time for: aftopnaked afbottomnaked amtopnaked ambottomnaked Same routine as before, only this time instead of putting the Adult files into a new package, you open up the one you just put the Elder files into & replace each Elder gmdc with the appropriate Adult equivalent. Bingo, you have just created an override that makes the Elders use the Adult nude mesh. To be fair, while I have done this, I haven't got a chance to test it out just yet, but will let you know if it works. (If you prefer pictures, I have those too.) If you are more interested in replacing a Maxis Mesh with a Custom one, it's the same deal only you replace the Maxis gmdc with the correct gmdc's from the Custom Mesh. If I can find the instructions (again) for the Custom-Mesh-Replacing, I will post it here. -ZW
__________________
** Long Live All Wild Canines! ** ** Leader Of The Moon-Bat Revolution! ** |
|
|
|
|
09-11-2008, 01:26 AM
|
#69 |
|
Da Guy Wut Owns Dis Joint
Join Date: Mar 2007
Location: Texas
Posts: 3,566
|
Oh! So that's all it takes! I just might give it a try!
__________________
Who are all these people and what do they know?
|
|
|
|
|
09-11-2008, 02:21 AM
|
#70 |
|
Goddess for Life
Join Date: Mar 2007
Location: NY State
Posts: 3,303
|
Ah! I'll have to try that too!
< hates Maxis elders >
__________________
A game that horrible Odessa-person introduced me to: http://www.puzzlepirates.com/?affili...163251&lang=en I'm spreading the addiction by corrupting all my friends (and attempting to make in-game money when they try the game). |
|
|
|
|
09-11-2008, 02:54 AM
|
#71 |
|
Da Guy Wut Owns Dis Joint
Join Date: Mar 2007
Location: Texas
Posts: 3,566
|
Indeed! Now if someone can just fix their posture, life will be very good!
__________________
Who are all these people and what do they know?
|
|
|
|
|
09-11-2008, 05:39 AM
|
#72 |
|
Reticulated MoonBat
Join Date: Apr 2007
Location: My trusty computer in Issaquah WA, USA.
Posts: 848
|
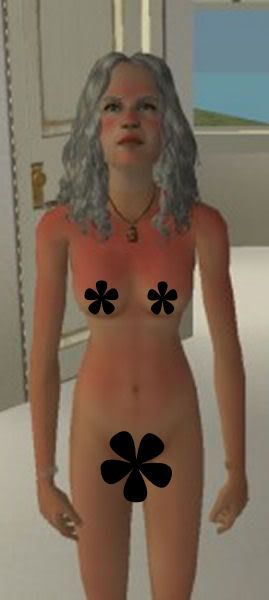
Well, my Default Mesh Replacement for Elders worked.
So do my Infant Hair Enabled Skins. Something I totally forgot to do however, was to remember to set the Material Definitions in my skin file to draw on the Adult, not Elder Textures! So, right now I have Elders using the "right" (Adult) meshes, but the "wrong" (Elder) skins. What exactly does that look like? Well, a little something like this: 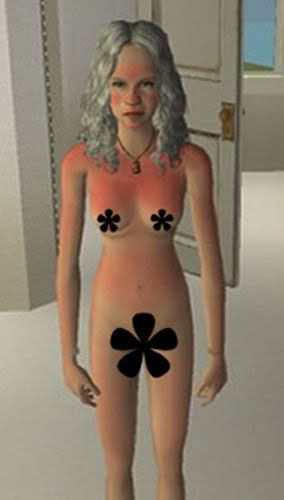 This is Woman Beta (another test Sim) & she's sunburned, so ignore the red stuff. Also ignore the silly black flower thingys; they're just covering her non-existent naughty bits. (I wasn't sure what the rules say about Barbie & Ken nudes, so I erred on the side of caution!) The "important" part is her bust line: while it's definitely an Adult mesh (no sagging) you can clearly see the "shade marks" where her breasts would have been, had she still been using the icky Maxis mesh. So once I go back & fix my Default Skins to uses the Adult Texture Images & not the Elder ones, things will be much better! Yes, she still "slouches" the way Maxis coded...but at least she looks a lot better doing it! -ZW
__________________
** Long Live All Wild Canines! ** ** Leader Of The Moon-Bat Revolution! ** Last edited by Zirconia Wolf : 09-11-2008 at 05:47 AM. |
|
|
|
|
09-11-2008, 05:50 AM
|
#73 |
|
Reticulated MoonBat
Join Date: Apr 2007
Location: My trusty computer in Issaquah WA, USA.
Posts: 848
|
Oops, I forgot;
Here's a copy of my override that makes Elders use the (Maxis) Adult meshes, if anybody wants to use it until they get time to make their own. (Just remember to update your skins, or suffer the fate of Woman Beta in the previous post!) -ZW
__________________
** Long Live All Wild Canines! ** ** Leader Of The Moon-Bat Revolution! ** |
|
|
|
|
09-11-2008, 11:47 AM
|
#74 |
|
Da Guy Wut Owns Dis Joint
Join Date: Mar 2007
Location: Texas
Posts: 3,566
|
Hooray! It's a great start!
Will custom skin tones pick up the change?
__________________
Who are all these people and what do they know?
|
|
|
|
|
09-11-2008, 01:03 PM
|
#75 |
|
Reticulated MoonBat
Join Date: Apr 2007
Location: My trusty computer in Issaquah WA, USA.
Posts: 848
|
If they are using the Maxis Meshes, they should. (I will be testing that as soon as I fix my Infant Hair Overrides to do away with all Maxian Elder ickyness.)
With the custom "Body Shapes", I would have to believe it would be along the lines of replacing the internal gmdc files. I will test this as soon as I have time & find a custom Body Shape I like. -ZW
__________________
** Long Live All Wild Canines! ** ** Leader Of The Moon-Bat Revolution! ** |
|
|
|
|
09-11-2008, 06:32 PM
|
#76 |
|
Da Guy Wut Owns Dis Joint
Join Date: Mar 2007
Location: Texas
Posts: 3,566
|
Yeah, I expect that I would have to do this for one of Warlokk's body shapes. Rats.
__________________
Who are all these people and what do they know?
|
|
|
|
|
09-11-2008, 06:45 PM
|
#77 |
|
Reticulated MoonBat
Join Date: Apr 2007
Location: My trusty computer in Issaquah WA, USA.
Posts: 848
|
After re-editing my Skin Overrides, here's the result:
 Woman Beta is looking much better...well, except for the sunburn & those silly flowers! -ZW
__________________
** Long Live All Wild Canines! ** ** Leader Of The Moon-Bat Revolution! ** |
|
|
|
|
09-11-2008, 06:53 PM
|
#78 |
|
Da Guy Wut Owns Dis Joint
Join Date: Mar 2007
Location: Texas
Posts: 3,566
|
I'm sure the flowers could be a serious social impediment.

__________________
Who are all these people and what do they know?
|
|
|
|
|
09-11-2008, 07:07 PM
|
#79 |
|
Reticulated MoonBat
Join Date: Apr 2007
Location: My trusty computer in Issaquah WA, USA.
Posts: 848
|
Thankfully, she doesn't have them in "real life". (Man Beta- her hubby- is happy about that! )Here are instruction by BlooM from InSim about making a Custom Body Mesh (in this example, the FM body) into a Default Replacement. (I suspect it would be the same thing if you were swapping custom-to-custom, too.) ****************************** You need SimPE to do this. Its very easy if you just want the files for yourself. Update the already existing default replacements with the FM body Backup 0 bottom and 0 top if you ever want to switch back. *open ''MESH_afBottom_FM_NakedHi.package'' with SimPE *click on the ''Geometric data container''(left window) *right click on the gmdc file in the right window and choose extract. *save the file(you can name it the same as War did but its not important, you can leave the long numbers as they are) *open ''0-bottom-default.package'' with SimPE *click on the ''Geometric data container''(left window) *right click on the gmdc file in the right window and choose replace. *Replace it with the file you extracted earlier.(if im right you have to pick the file first listed as there are 2, you must NOT replace it with the xml file.) *you get a pop-up that asks you if you want to load it, click yes. *Save Repeat the same steps for the top meshes. Now the FM will be your default nude in the shower for all sims. You can use one of my default replacements to do the same with the fullbody, I suggest you take the ''Blooms_sexyfeetDefaultUnderwearoverride_Mesh.rar '' located here:http://www.insimenator.net/showthread.php?t=52547 I explained how to change the default replacements for your private use by using files of others, do not upload these!!!! If you want to build complete new packages, just ask me. ****************************** My "ultimate goal" is to get the in-game Fit ("cut") stage to draw on the Athletic Girl & Slim Body Builder meshes, so a Fit Sim actually looks fit! On the other hand, I kinda want to spend some time actually playing the game for a while... -ZW
__________________
** Long Live All Wild Canines! ** ** Leader Of The Moon-Bat Revolution! ** |
|
|
|
|
09-11-2008, 10:02 PM
|
#80 |
|
Goddess for Life
Join Date: Mar 2007
Location: NY State
Posts: 3,303
|
A lot of people use the Bnat top for the elders so they're a little saggy, but not droopy. And larger "nat" sizes so their elders don't shrivel up!
Tutorials for non-defaults: jwilson5's warlokk/body builder tutorial (no pictures) marvine's tutorial (older version of SimPE) Theo's tutorial BTW, I asked Yakov/BeosBoxBoy about using Athletic Girl/Fit Chick/Body Builders for just the "cut" versions of the defaults, and he said it was pretty nasty, because "cut" and "normal" use the same mesh and property set. But a little later, Jwilson5 did it for one of her non-default skintone sets... Maybe you could look at her work...
__________________
A game that horrible Odessa-person introduced me to: http://www.puzzlepirates.com/?affili...163251&lang=en I'm spreading the addiction by corrupting all my friends (and attempting to make in-game money when they try the game). |
|
|
|
 |
| Thread Tools | |
|
|


